Brewiz is a modern web interface for managing Homebrew packages on macOS. It provides an intuitive way to browse, select, and generate Homebrew commands for package installation and management.
For an interactive demo you can visit: https://brewiz.github.io/app/dist
- 🎯 Visual package selection interface
- 📦 Browse packages by categories
- 🔎 Quick search and filtering
- 🔄 Real-time command generation
- 🚀 One-click copy of commands
- 💫 Responsive design
- 🎨 Visual status indicators for installed/outdated packages
Note: Brewiz requires Homebrew to be installed on your system. If you don't have Homebrew yet, visit brew.sh to install it first.
The header contains a centralized search bar that allows you to:
- Filter packages by name
- Search package descriptions
- Quickly find specific tools and utilities
The easiest way to use Brewiz is to add this alias to your shell configuration file (e.g., ~/.zshrc):
alias brewiz='/usr/bin/ruby -e "$(curl -fsSL https://brewiz.github.io/bin/brewiz)" --'Then simply run brewiz in your terminal.
If you prefer not to install anything, you can run it directly:
/usr/bin/ruby -e "$(curl -fsSL https://brewiz.github.io/bin/brewiz)"For offline use or customization:
curl -fsSL -o brewiz https://brewiz.github.io/bin/brewiz
chmod +x brewiz
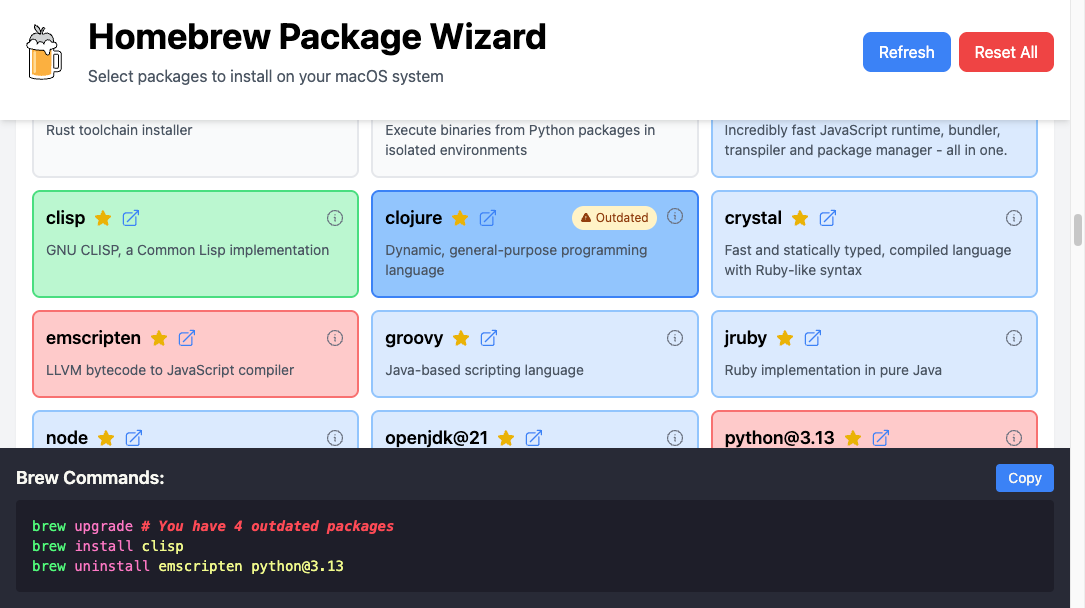
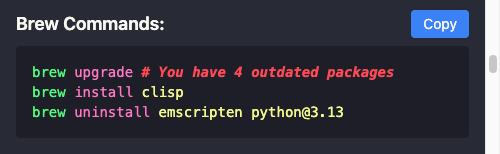
./brewiz- When you run Brewiz, it starts a local web server and opens your browser.
- You'll see all available Homebrew packages organized by category.
- Color coding:
- Blue: already installed
- White: available to install
- Green: selected for install
- Red: selected for uninstall
- The command panel at the bottom shows the generated Homebrew commands.
- Click "Copy" to copy the commands to your clipboard.
- Paste into your terminal to execute.
Usage: brewiz [options]
    -a, --address ADDRESS            Address to run Server on
    -p, --port PORT                  Port to run Server on
    -c, --cache                      Enable caching of brew info results
        --packages LOCATION          URL or file path to packages.yaml package list
        --no-open                    Do not open browser automatically
        --app-url URL                URL for frontend assets (dev only)
    -d, --dev                        Run in development mode
        --access                     Enable access log (dev only)
        --zsh-completion             Generate zsh completion script
    -v, --version                    Show version
    -h, --help                       Show this help message
Brewiz uses a YAML file to define package categories and packages. The loader automatically ignores any documentation or metadata sections at the top of the YAML file (such as Title, Description, or Disclaimers). Only the list of categories (with id, name, desc, and packages) is processed. This allows you to include documentation in your YAML file without affecting package loading.
- Node.js (v18 or higher)
- Ruby (v2.6, v3 or higher)
- Clone the repository:
git clone https://github.com/wstein/brewiz.git
cd brewiz- Install dependencies:
rake install- Start the development environment:
rake devThe backend server will be available at http://localhost:8047 and the frontend dev server at http://localhost:8048.
Brewiz uses a central VERSION file at the root of the project to manage version information across all components.
To create a production build:
rake buildThe built files will be in the app/dist and bin directory.
| Task | Description |
|---|---|
rake build |
Build production executable and frontend |
rake update_version |
Update version in all files |
rake build_frontend |
Build only the frontend |
rake clean |
Remove build artifacts |
rake install |
Install dependencies |
rake dev |
Start development environment |
rake publish |
Create and push a new version tag |
rake unpublish |
Remove the current version tag |
When started in dev mode (rake dev or ruby brewiz --dev), Brewiz runs two separate processes that work together:
- Acts as the entry point for the application
- Runs on port 8047 (http://localhost:8047)
- Started with the
--devflag:ruby brewiz --dev - Provides real Homebrew data via API endpoints (
/api/v1/*) - Handles package management operations through the Homebrew CLI
- In development mode, proxies frontend asset requests to the Vite dev server
- Changes to backend code require manual restart of the server
- Runs on port 8048 (http://localhost:8048)
- Started automatically by the
rake devtask - Powered by Vite with hot module replacement (HMR)
- Serves the SolidJS application with live reloading
- Source maps are enabled for easier debugging
- Changes to components and styles are reflected instantly without page reloads
- The
rake devtask starts both servers in the correct order. - The backend server (
brewiz --dev) connects to the frontend dev server. - Make changes to backend Ruby code and restart when needed.
- Make changes to frontend code and see them immediately.
- API requests from the frontend are handled by the backend server.
- The Rake task handles proper startup/shutdown of both servers.
In production mode:
- Static files are loaded from the GitHub repository
- Frontend is optimized for production
- Only the backend server is started (default port 8047)
- SolidJS - Frontend framework
- Tailwind CSS - Styling
- Vite - Build tool
- Ruby - Backend server
This project is licensed under the MIT License - see the LICENSE file for details.